
宝塔面板部署easytier教程
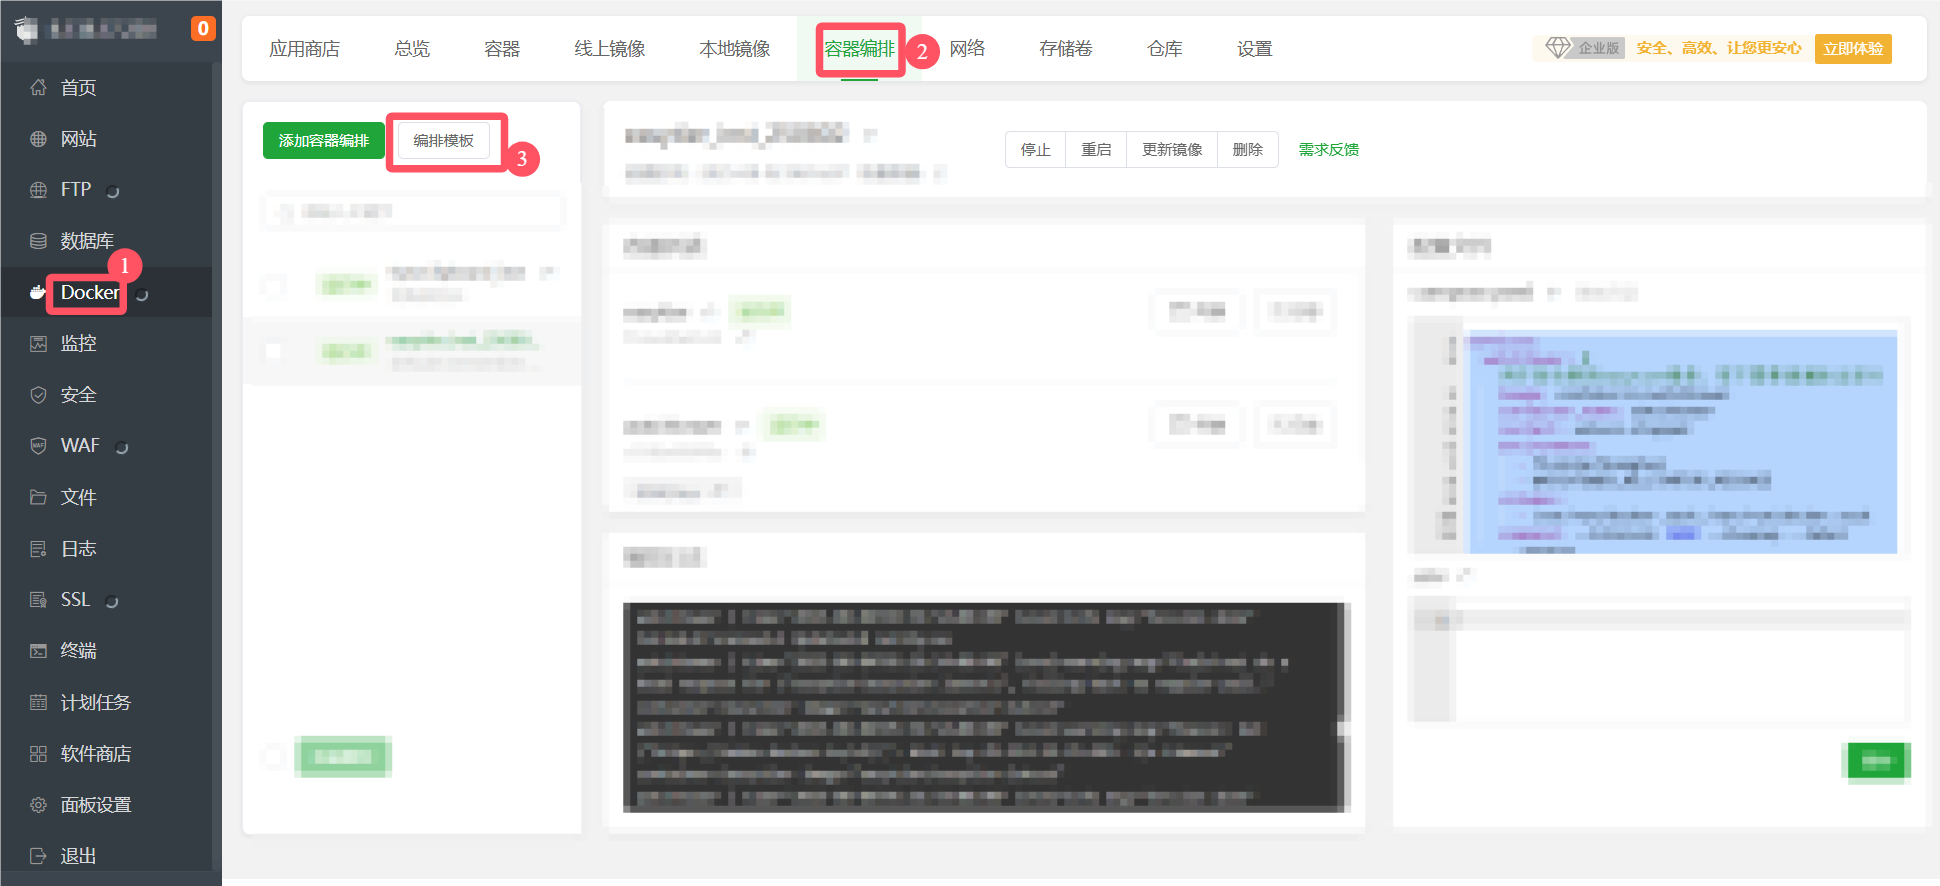
如下图所示,依次点击Docker->容器编排-> 编排面板,之后点击"添加"。
模板名任意,备注任意,内容填写如图所示内容。
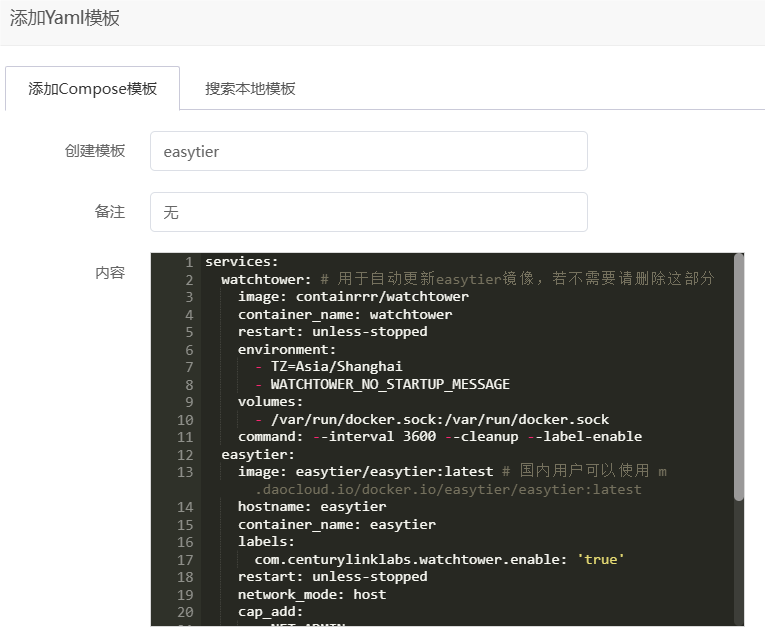
easytier通过Docker Compose安装 - 官网链接
services:
watchtower: # 用于自动更新easytier镜像,若不需要请删除这部分
image: containrrr/watchtower
container_name: watchtower
restart: unless-stopped
environment:
- TZ=Asia/Shanghai
- WATCHTOWER_NO_STARTUP_MESSAGE
volumes:
- /var/run/docker.sock:/var/run/docker.sock
command: --interval 3600 --cleanup --label-enable
easytier:
image: easytier/easytier:latest # 国内用户可以使用 m.daocloud.io/docker.io/easytier/easytier:latest
hostname: easytier
container_name: easytier
labels:
com.centurylinklabs.watchtower.enable: 'true'
restart: unless-stopped
network_mode: host
cap_add:
- NET_ADMIN
- NET_RAW
environment:
- TZ=Asia/Shanghai
devices:
- /dev/net/tun:/dev/net/tun
volumes:
- /etc/easytier:/root
- /etc/machine-id:/etc/machine-id:ro # 映射宿主机机器码
command: -d --network-name <用户> --network-secret <密码> -p tcp://public.easytier.cn:11010
以下部分是用户需要修改的部分,其余部分一般不用修改:
command: -d --network-name <用户> --network-secret <密码> -p tcp://public.easytier.cn:11010
其中<用户>和<密码>需要修改, -p tcp://public.easytier.cn:11010可以不填写,如果填写,意味着连接到公共服务器,可通过公共服务器连接至部署的私有服务端(不填写则需要通过ip地址或者域名连接部署的服务端)。
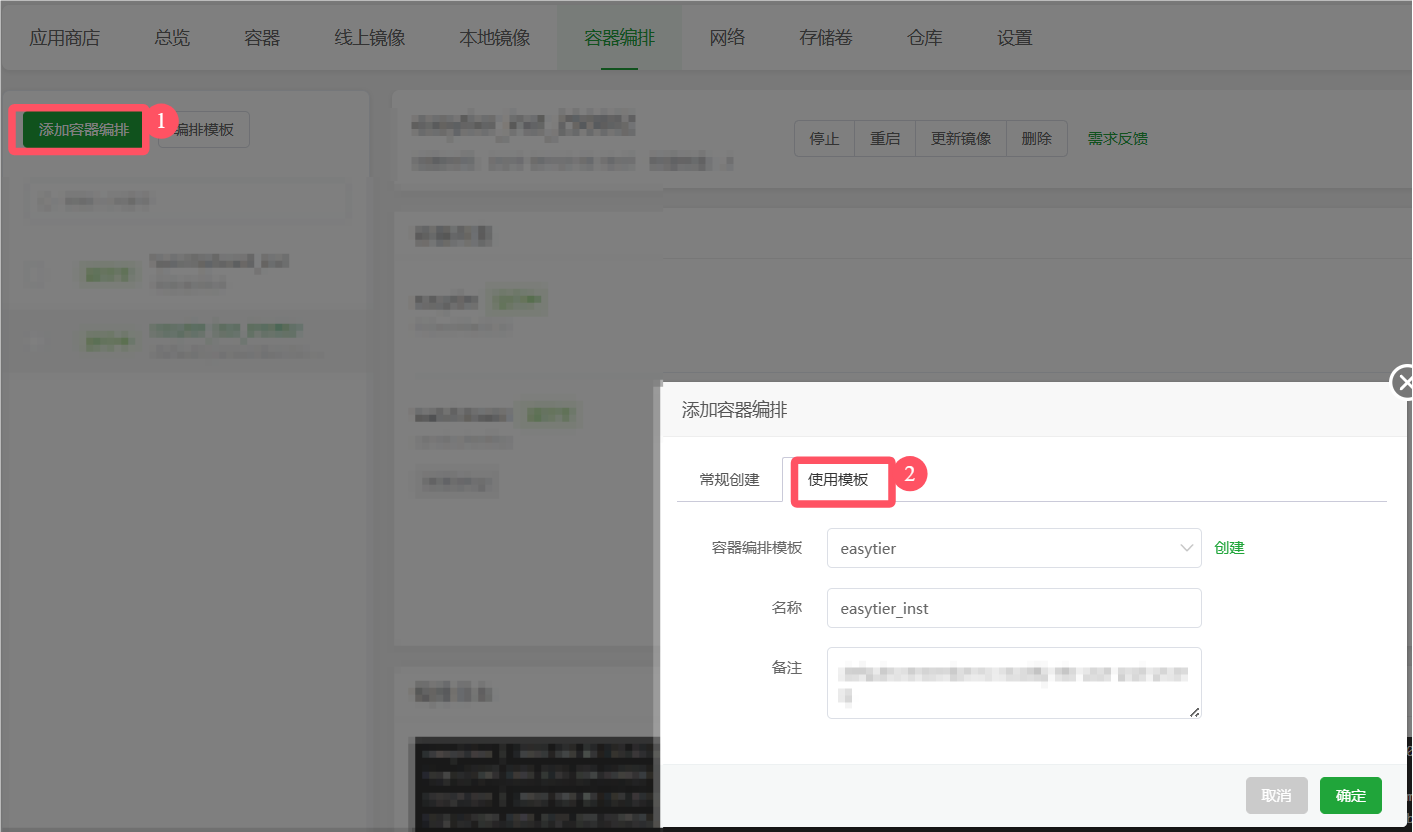
完成后,如下图所示,依次点击添加容器编排->使用模板,选择刚才创建的模板,并填写例化名称以及备注(任意),再点击"确定"后即可创建实例。
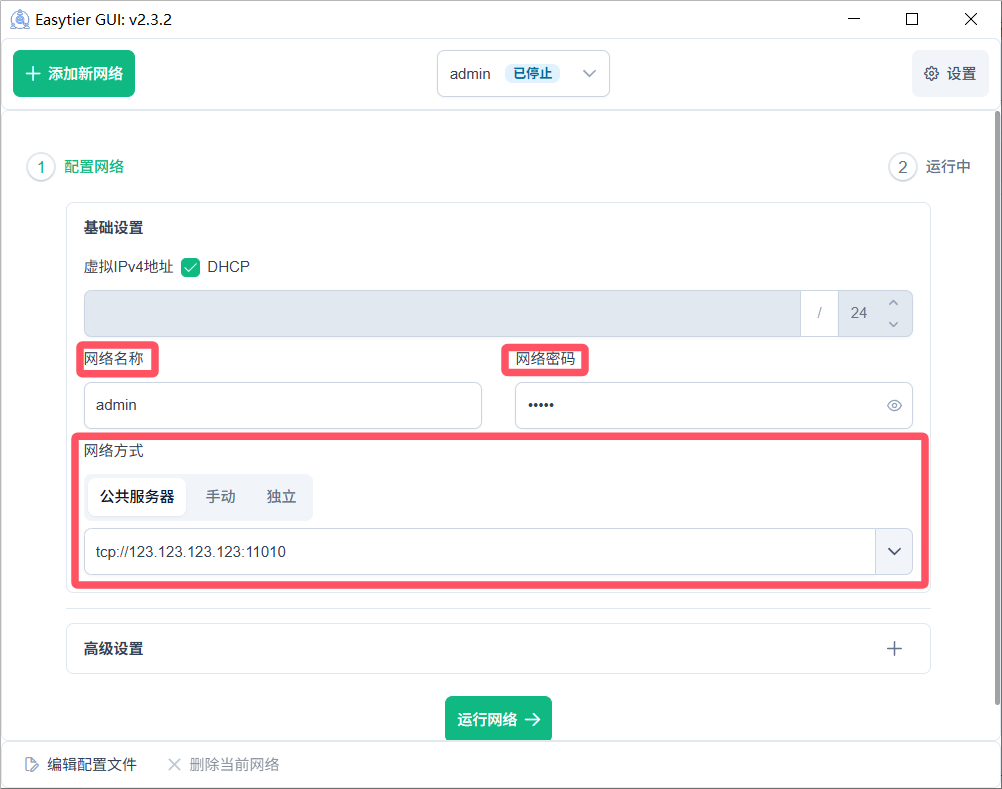
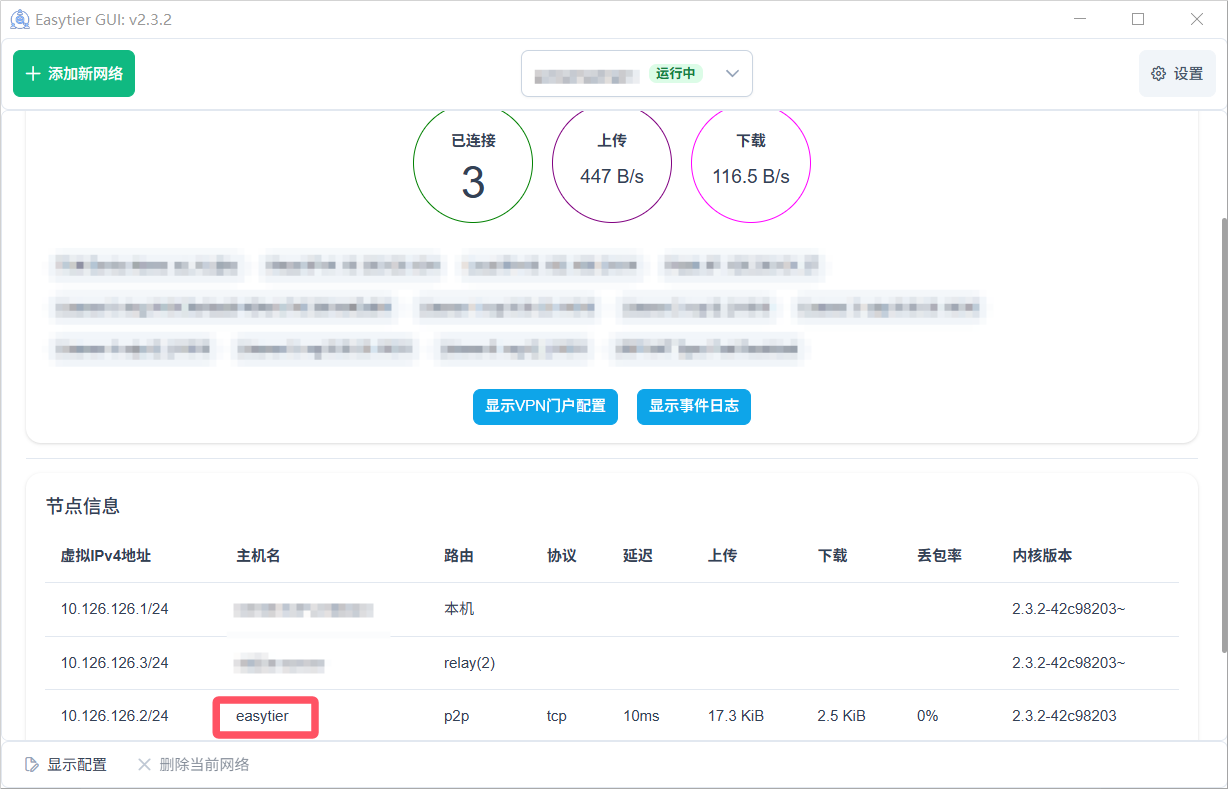
随后打开客户端,如下图所示,在网络名称处填写此前的<用户>,网络密码填写此前的<密码>,网络方式填写服务器的ip地址(或者你的域名)以及端口,端口默认是11010。之后点击"运行网络"即可连接至服务端。
如果此前的配置文件hostname: easytier,如下图所示,若主机名为easytier,说明配置正确,同时连接服务器成功,恭喜你配置完成,可以愉快使用!
其他内容:
command后可添加的其他内容:
依次点击终端->请选择shell:sh->确认。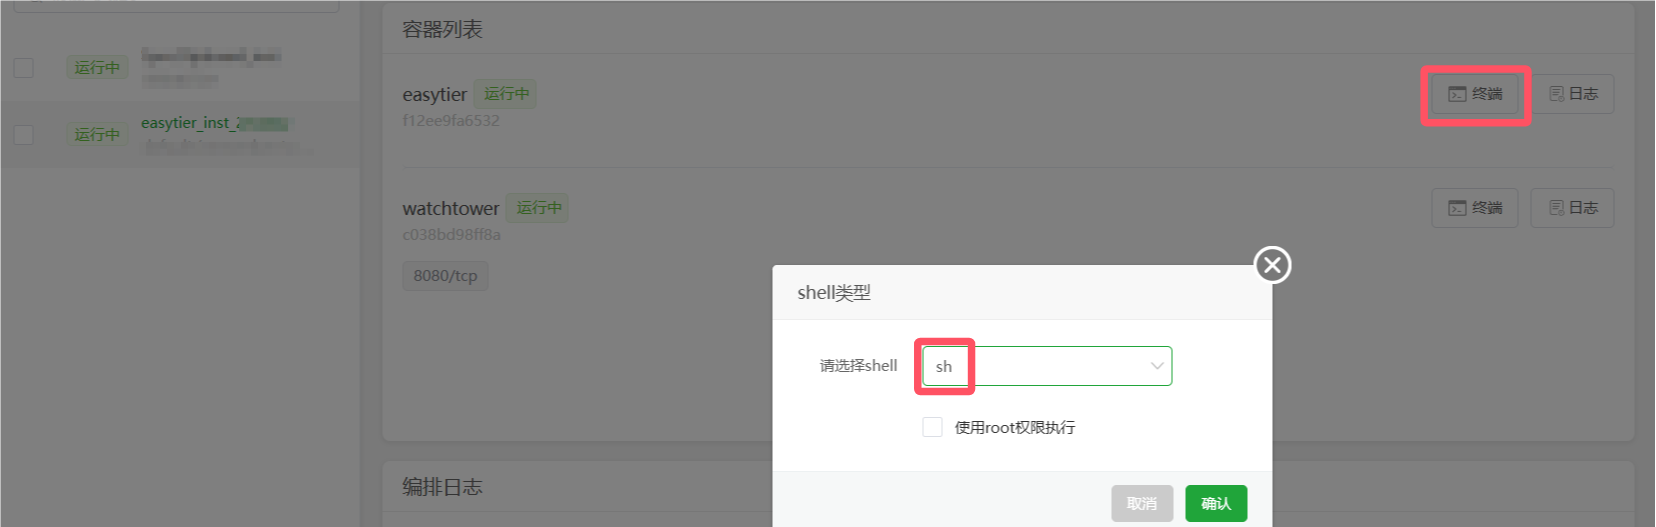
输入easytier-core --help,弹出以下内容(这些内容即可加载command后):
/app # easytier-core --help
A full meshed p2p VPN, connecting all your devices in one network with one command.Usage: easytier-core [OPTIONS]
Options:
-w, --config-server <CONFIG_SERVER>
config server address, allow format:
full url: --config-server udp://127.0.0.1:22020/admin
only user name: --config-server admin, will use official server
[env: ET_CONFIG_SERVER=]--machine-id <MACHINE_ID>
the machine id to identify this machine, used for config recovery after disconnection, must be unique and
fixed. default is from system.
[env: ET_MACHINE_ID=]-c, --config-file <CONFIG_FILE>...
path to the config file, NOTE: the options set by cmdline args will override options in config file
[env: ET_CONFIG_FILE=]--network-name <NETWORK_NAME>
network name to identify this vpn network
[env: ET_NETWORK_NAME=]--network-secret <NETWORK_SECRET>
network secret to verify this node belongs to the vpn network
[env: ET_NETWORK_SECRET=]-i, --ipv4 <IPV4>
ipv4 address of this vpn node, if empty, this node will only forward packets and no TUN device will be
created
[env: ET_IPV4=]-d, --dhcp [<DHCP>]
automatically determine and set IP address by Easytier, and the IP address starts from 10.0.0.1 by
default. Warning, if there is an IP conflict in the network when using DHCP, the IP will be automatically
changed.
[env: ET_DHCP=] [possible values: true, false]-p, --peers [<PEERS>...]
peers to connect initially
[env: ET_PEERS=]-e, --external-node <EXTERNAL_NODE>
use a public shared node to discover peers
[env: ET_EXTERNAL_NODE=]-n, --proxy-networks <PROXY_NETWORKS>
export local networks to other peers in the vpn, e.g.: 10.0.0.0/24.
also support mapping proxy network to other cidr, e.g.: 10.0.0.0/24->192.168.0.0/24
other peers can access 10.0.0.1 with ip 192.168.0.1
[env: ET_PROXY_NETWORKS=]-r, --rpc-portal <RPC_PORTAL>
rpc portal address to listen for management. 0 means random port, 12345 means listen on 12345 of
localhost, 0.0.0.0:12345 means listen on 12345 of all interfaces. default is 0 and will try 15888 first
[env: ET_RPC_PORTAL=]--rpc-portal-whitelist <RPC_PORTAL_WHITELIST>
rpc portal whitelist, only allow these addresses to access rpc portal, e.g.: 127.0.0.1,127.0.0.0/8,::1/128
[env: ET_RPC_PORTAL_WHITELIST=]-l, --listeners [<LISTENERS>...]
listeners to accept connections, allow format:
port number: <11010>. means tcp/udp will listen on 11010, ws/wss will listen on 11010 and 11011, wg will
listen on 11011
url: <tcp://0.0.0.0:11010>. tcp can be tcp, udp, ring, wg, ws, wss
proto & port pair: <proto:port>. wg:11011, means listen on 11011 with wireguard protocol url and
proto:port can occur multiple times.
[env: ET_LISTENERS=]--mapped-listeners [<MAPPED_LISTENERS>...]
manually specify the public address of the listener, other nodes can use this address to connect to this
node. e.g.: tcp://123.123.123.123:11223, can specify multiple.
[env: ET_MAPPED_LISTENERS=]--no-listener
do not listen on any port, only connect to peers
[env: ET_NO_LISTENER=]--hostname <HOSTNAME>
host name to identify this device
[env: ET_HOSTNAME=]-m, --instance-name <INSTANCE_NAME>
instance name to identify this vpn node in same machine
[env: ET_INSTANCE_NAME=]--vpn-portal <VPN_PORTAL>
url that defines the vpn portal, allow other vpn clients to connect. example:
wg://0.0.0.0:11010/10.14.14.0/24, means the vpn portal is a wireguard server listening on
vpn.example.com:11010, and the vpn client is in network of 10.14.14.0/24
[env: ET_VPN_PORTAL=]--default-protocol <DEFAULT_PROTOCOL>
default protocol to use when connecting to peers
[env: ET_DEFAULT_PROTOCOL=]-u, --disable-encryption [<disable_ENCRYPTION>]
disable encryption for peers communication, default is false, must be same with peers
[env: ET_DISABLE_ENCRYPTION=] [possible values: true, false]--multi-thread [<MULTI_THREAD>]
use multi-thread runtime, default is single-thread
[env: ET_MULTI_THREAD=] [possible values: true, false]--disable-ipv6 [<DISABLE_IPV6>]
do not use ipv6
[env: ET_DISABLE_IPV6=] [possible values: true, false]--dev-name <DEV_NAME>
optional tun interface name
[env: ET_DEV_NAME=]--mtu <MTU>
mtu of the TUN device, default is 1380 for non-encryption, 1360 for encryption
[env: ET_MTU=]--latency-first [<LATENCY_FIRST>]
latency first mode, will try to relay traffic with lowest latency path, default is using shortest path
[env: ET_LATENCY_FIRST=] [possible values: true, false]--exit-nodes [<EXIT_NODES>...]
exit nodes to forward all traffic to, a virtual ipv4 address, priority is determined by the order of the
list
[env: ET_EXIT_NODES=]--enable-exit-node [<ENABLE_EXIT_NODE>]
allow this node to be an exit node
[env: ET_ENABLE_EXIT_NODE=] [possible values: true, false]--proxy-forward-by-system [<PROXY_FORWARD_BY_SYSTEM>]
forward packet to proxy networks via system kernel, disable internal nat for network proxy
[env: ET_PROXY_FORWARD_BY_SYSTEM=] [possible values: true, false]--no-tun [<NO_TUN>]
do not create TUN device, can use subnet proxy to access node
[env: ET_NO_TUN=] [possible values: true, false]--use-smoltcp [<USE_SMOLTCP>]
enable smoltcp stack for subnet proxy and kcp proxy
[env: ET_USE_SMOLTCP=] [possible values: true, false]--manual-routes [<MANUAL_ROUTES>...]
assign routes cidr manually, will disable subnet proxy and wireguard routes propagated from peers. e.g.:
192.168.0.0/16
[env: ET_MANUAL_ROUTES=]--relay-network-whitelist [<RELAY_NETWORK_WHITELIST>...]
only forward traffic from the whitelist networks, supporting wildcard strings, multiple network names can
be separated by spaces.
if local network (assigned with network_name) is not in the whitelist, the traffic can still be forwarded
if no other route path is available.
if this parameter is empty, forwarding is disabled. by default, all networks are allowed.
e.g.: '*' (all networks), 'def*' (networks with the prefix 'def'), 'net1 net2' (only allow net1 and net2)"
[env: ET_RELAY_NETWORK_WHITELIST=]--disable-p2p [<disable_P2P>]
disable p2p communication, will only relay packets with peers specified by --peers
[env: ET_DISABLE_P2P=] [possible values: true, false]--disable-udp-hole-punching [<DISABLE_UDP_HOLE_PUNCHING>]
disable udp hole punching
[env: ET_DISABLE_UDP_HOLE_PUNCHING=] [possible values: true, false]--relay-all-peer-rpc [<RELAY_ALL_PEER_RPC>]
relay all peer rpc packets, even if the peer is not in the relay network whitelist. this can help peers
not in relay network whitelist to establish p2p connection.
[env: ET_RELAY_ALL_PEER_RPC=] [possible values: true, false]--socks5 <SOCKS5>
enable socks5 server, allow socks5 client to access virtual network. format: <port>, e.g.: 1080
[env: ET_SOCKS5=]--compression <COMPRESSION>
compression algorithm to use, support none, zstd. default is none
[env: ET_COMPRESSION=]--bind-device <BIND_DEVICE>
bind the connector socket to physical devices to avoid routing issues. e.g.: subnet proxy segment
conflicts with a node's segment, after binding the physical device, it can communicate with the node
normally.
[env: ET_BIND_DEVICE=] [possible values: true, false]--enable-kcp-proxy [<ENABLE_KCP_PROXY>]
proxy tcp streams with kcp, improving the latency and throughput on the network with udp packet loss.
[env: ET_ENABLE_KCP_PROXY=] [possible values: true, false]--disable-kcp-input [<DISABLE_KCP_INPUT>]
do not allow other nodes to use kcp to proxy tcp streams to this node. when a node with kcp proxy enabled
accesses this node, the original tcp connection is preserved.
[env: ET_DISABLE_KCP_INPUT=] [possible values: true, false]--enable-quic-proxy [<ENABLE_QUIC_PROXY>]
proxy tcp streams with QUIC, improving the latency and throughput on the network with udp packet loss.
[env: ET_ENABLE_QUIC_PROXY=] [possible values: true, false]--disable-quic-input [<DISABLE_QUIC_INPUT>]
do not allow other nodes to use QUIC to proxy tcp streams to this node. when a node with QUIC proxy
enabled accesses this node, the original tcp connection is preserved.
[env: ET_DISABLE_QUIC_INPUT=] [possible values: true, false]--port-forward <PORT_FORWARD>...
forward local port to remote port in virtual network. e.g.: udp://0.0.0.0:12345/10.126.126.1:23456, means
forward local udp port 12345 to 10.126.126.1:23456 in the virtual network. can specify multiple.
[env: ET_PORT_FORWARD=]--accept-dns <ACCEPT_DNS>
if true, enable magic dns. with magic dns, you can access other nodes with a domain name, e.g.:
<hostname>.et.net. magic dns will modify your system dns settings, enable it carefully.
[env: ET_ACCEPT_DNS=] [possible values: true, false]--private-mode <PRIVATE_MODE>
if true, nodes with different network names or passwords from this network are not allowed to perform
handshake or relay through this node.
[env: ET_PRIVATE_MODE=] [possible values: true, false]--foreign-relay-bps-limit <FOREIGN_RELAY_BPS_LIMIT>
core_clap.foreign_relay_bps_limit
[env: ET_FOREIGN_RELAY_BPS_LIMIT=]--console-log-level <CONSOLE_LOG_LEVEL>
console log level
[env: ET_CONSOLE_LOG_LEVEL=]--file-log-level <FILE_LOG_LEVEL>
file log level
[env: ET_FILE_LOG_LEVEL=]--file-log-dir <FILE_LOG_DIR>
directory to store log files
[env: ET_FILE_LOG_DIR=]-h, --help
Print help-V, --version
Print version
IOS端使用教程:
由于各种原因,easytier暂时未上架App store。若需要在IOS端使用easytier,需要配合wireguard使用。假设原本的command配置如下:
command: -d --network-name "网络名称" --network-secret "网络密码" --enable-kcp-proxy --enable-quic-proxy --ipv4 10.126.126.1
若需要开启wireguard支持,给command增加 2个命令,变为如下内容:
command: -d --network-name "网络名称" --network-secret "网络密码" --enable-kcp-proxy --enable-quic-proxy --ipv4 10.126.126.1 --vpn-portal wg://0.0.0.0:11011/10.14.14.0/24 --proxy-networks 10.14.14.0/24
其中0.0.0.0:11011中的11011对应需要服务端新开放的端口,防火墙需放行该端口udp数据。10.14.14.0对应wireguard设备可分配的ip地址为10.14.14.1~10.14.14.255。
注意,有的运营商对wireguard的使用作了限制,建议连接手机热点(使用流量)进行测试!
后面的操作参考:easytier使用记录

加入社区!打开量化的大门,首批课程上线啦!
更多推荐

 7
7 0
0- 0


 已为社区贡献1条内容

所有评论(0)